What does it mean to have tight hips? This common complaint can have many causes because the ‘hips’ are actually a group of muscles and connective tissues that surround the hip joints, which are the ball and socket joints where the heads of your femurs (thigh bones) meet your pelvis.
Tight hips can refer to the hip flexor muscles, which control a lot of lower body movement, as well as the glutes, psoas, piriformis, and other deep muscles of the buttocks. Tightness in any of these muscles can cause pain and limit range of motion. Fortunately, there are many yoga poses that target these areas.
How Yoga Can Help Tight Hips
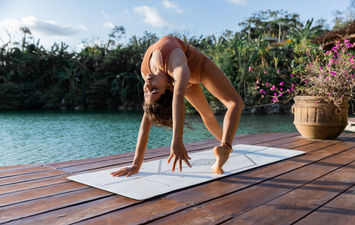
Yoga asana is a full-body movement practice. Since the hips are right in the middle of your body, they are involved in a majority of standing and seated poses. However, some postures really get deep into the hips and begin to open areas that are tight, whether from sitting, running, or underuse. If you find resistance in your body to any pose, don’t force it. Use props, modify, and practice regularly and you will see improvements in your flexibility over time.
Best Poses to Loosen Tight Hips

Cobbler’s Pose (Baddha Konasana)
Also Known As: Butterfly Pose, Bound Angle Pose
Sanskrit Meaning: Baddha (Bound) Kona (Angle)
Yoga Level: Beginner
Pose Type: Seated
Benefits: Stretches the hips, groins, shins, and feet.
Props: A bolster or a folded blanket under your seat helps you sit up straight without rounding the spine.
Step-by-Step:
- Sit with your knees bent and your feet flat on your mat and close together.
- Open your knees to either side like a book and bring the soles of your feet together.
- Hold onto your ankles and draw your spine straight.

Reclined Pigeon Pose (Sucirandhrasana)
Also Known As: Eye of the Needle Pose
Sanskrit Meaning: Suci (Needle) Randra (Opening)
Yoga Level: Beginner
Pose Type: Supine
Benefits: Stretches the hip flexors and lower back.
Step-by-Step:
- Lie on your back with both legs bent, knees pointing toward the ceiling, and feet flat on the mat.
- Hug your right knee into your chest, then place your right ankle onto your left thigh near your left knee. Your right knee will point toward the right.
- Stay here or lift your left foot off the floor. Reach a hand to either side of your left thigh so you’re holding onto the back of your left thigh.
- Draw your left thigh toward your chest any amount.
- After several breaths, do the other side.

Pigeon Pose Prep (Eka Pada Rajakapotasana)
Sanskrit Meaning: Eka (One) Pada (Foot) Raja (King) Kapota (Pigeon)
Yoga Level: Beginner
Pose Type: Seated
Benefits: Opens the pelvic and buttock muscles, including the psoas. Stretches the hamstrings and quads.
Props: A bolster or several folded blankets can be used to even out the hips.
Step-by-Step:
- Begin in a hands and knees position. Have your props on the right side of your mat.
- Bring your right knee forward to the inside of your right hand. Bring your right ankle across the Central Line toward your left hip or wrist, depending on how flexible you are.
- Turn your left toes under and scoot your left knee toward the back of your mat so that the top of the left thigh is on the mat.
- If there’s a lot of space between your right hip and the floor, use your blankets or bolster to fill the gap so that your pelvis is in a neutral position.
- Keep your torso upright or forward bend over your front knee.
- After five to ten breaths, come back to your hands and knees and do the pose with the left leg forward.

Crescent Lunge Pose (Anjaneyasana)
Sanskrit Meaning: Anjani (Hindu Goddess)
Yoga Level: Beginner
Pose Type: Kneeling
Benefits: Stretches the quads, hamstrings, and hips. Strengthens the core.
Props: A Yoga Pad or blanket under your knee makes the pose more comfortable.
Step-by-Step:
- From Downward Facing Dog, step your right foot to the inside of your right hand.
- Lower your left knee to your mat and untuck your left toes so the top of your left foot is on the mat.
- Lift your hands away from the floor and take your arms overhead.
- You can keep your right knee stacked over your right ankle or deepen the stretch by moving the right knee and your pelvis forward.
- After several breaths, return your hands to the floor, step back to Downward Facing Dog and do the pose with the left foot forward.

Revolved Crescent Lunge Pose (Parivrtta Anjaneyasana)
Sanskrit Meaning: Parivrtta (Revolved) Anjani (Hindu Goddess)
Yoga Level: Beginner
Pose Type: Kneeling
Benefits: Stretches the quads, hamstrings, and hips.
Props: Pad under the back knee as necessary.
Step-by-Step:
- From Anjaneyasana, bend your left knee and reach your right hand back to catch your left foot.
- Open your chest toward the right.
- Take several breaths and then switch sides.

Lizard Pose (Utthan Pristhasana)
Sanskrit Meaning: Utthan (Intense) Pristha (Back)
Yoga Level: Intermediate
Pose Type: Standing
Benefits: Stretches and strengthens the hip flexors, quads, glutes, and hamstrings.
Cautions: Avoid this posture if you have a groin injury.
Props: Two blocks and a Yoga Pad or blanket can be helpful.
Step-by-Step:
- From Downward Facing Dog, step your right foot to the outside of your right hand.
- Lower your forearms to your mat with your elbows under your shoulders and your forearms parallel. If the floor seems too far away, use a block under each forearm instead.
- Keep your left leg straight or lower your knee to the mat, taking padding as necessary.
- Hug your right knee to your right shoulder, keep your pelvis neutral and your gaze between your hands.
- After several breaths, step back to Downward Dog and do the pose with the left leg forward.

High Lunge
Yoga Level: Beginner
Pose Type: Standing
Benefits: Stretches and strengthens the hip flexors, quads, glutes, and hamstrings.
Step-by-Step:
- From Downward Facing Dog, step your right foot to the inside of your right hand.
- Press into your feet and lift your hands off the floor.
- Bring your hands to your hips and make sure your pelvis stays facing forward.
- Deepen your right knee so that your knee is over your ankle and your right thigh is parallel to the floor.
- Stay up on the ball of your left foot and keep your left leg straight.
- Lift your arms up toward the ceiling.
- After several breaths, release your hands to the floor, step back to Downward Facing Dog and do the other side.

Malasana (Garland Pose)
Sanskrit Meaning: Mala (Garland)
Yoga Level: Beginner
Pose Type: Standing
Benefits: Stretches and strengthens the feet, ankles, and inner thighs.
Props: Have a block and a rolled blanket handy.
Step-by-Step:
- Stand on your mat with your feet 12-18 inches apart. Turn your toes out slightly.
- Bend your knees and lower your butt toward the floor.
- Keep your heels grounded on the floor. If the heels come up, slide the rolled blanket under them so they can bear weight.
- If your squat maxes out at an awkward height that’s difficult to maintain, take a block or two under your butt for support.
- Take your upper arms to the insides of your thighs and bring your hands into Anjali Mudra at your heart. Use your arms to gently nudge your knees open.

Half Lotus Pose (Ardha Padmasana)
Sanskrit Meaning: Ardha (Half) Padma (Lotus)
Yoga Level: Beginner
Pose Type: Seated
Benefits: Stretches the outer thighs and glutes.
Cautions: Don’t force the legs into position. Avoid if you have a knee injury.
Props: Sit on a folded blanket or bolster if your knees are above your hips in this position.
- Sit on your mat in a comfortable cross-legged position with your right leg in front.
- Use your hands to place your right foot on top of your left thigh as close to the hip crease as possible.
- Release your right knee toward the floor.
- Tale five to ten breaths and then try the pose with your left foot on top. You may discover one side feels more comfortable than the other.

Cow Face Pose (Gomukhasana)
Sanskrit Meaning: Go (Cow) Mukha (Face)
Yoga Level: Beginner
Pose Type: Seated
Benefits: Stretches the outer thighs and glutes.
Props: Sitting on a block or a folded blanket can make this posture more comfortable.
Step-by-Step:
- Sit on your mat in a Half Lotus Pose with your right leg on top.
- Slide your left foot to the outside of your right hip and your right foot to the outside of your left hip. Your knees will be stacked right over left at the midline.
- If you find it hard to sit up straight in this position, take padding under your butt.
- Lift your left arm straight up towards the ceiling. Bend your left elbow and release your left hand to the middle of your shoulder blades.
- Reach your right arm around your back, bending at the elbow so that your right and left hands meet in the middle of your back. If the hands don’t meet, you can take a strap between them, hold onto your shirt, or just reach the hands toward each other.
- After several breaths, release your hands, uncross your legs, and switch sides.

Fire-Log Pose (Agnistambhasana)
Sanskrit Meaning: Agni (Fire) Stambh (Log)
Also Known As: Double Pigeon, Knee to Ankle
Yoga Level: Intermediate
Pose Type: Seated
Benefits: Stretches the outer thighs and glutes.
Props: Sit on a block or a folded blanket if necessary and have a block handy.
Step-by-Step:
- Begin in a seated cross-legged position with your right leg in front.
- Use your hands to place your right ankle on top of your left knee.
- Scoot your left ankle forward so that it lines up under your right knee. If there’s a big gap between your right knee and left ankle, take a block between them for support.
- Keep both feet flexed.
- This pose can feel very intense. Take a few deep breaths if you’re uncomfortable and then switch sides.

Happy Baby (Ananda Balasana)
Sanskrit Meaning: Ananda (Blissful) Bala (Child)
Yoga Level: Beginner
Pose Type: Prone
Benefits: Stretches the outer thighs, hamstrings and glutes.
Step-by-Step:
- Lie down on your back and hug your knees into your chest.
- Separate your knees so that they come towards your armpits on either side.
- Lift the soles of your feet towards the ceiling, stacking your ankles over your knees.
- Reach your hands up and hold the outside of each foot, flexing the feet strongly. If you can’t reach your feet, hold onto your shins or ankles.
- Keep your sacrum on the floor.
Happy Hips
A consistent, well-rounded yoga practice stretches and strengthens your entire body. Including the above poses will ensure that every part of your hips gets plenty of attention. Change takes time, so be patient with yourself, get on your mat regularly, and your flexibility will improve.